Som företagets nätverkstekniker har du fått i uppdrag att konfigurera en Cisco-router som en DHCP-server för att tillhandahålla dynamisk tilldelning av IP-adresser till klienter på nätverket. Du måste även konfigurera Edge-routern som en DHCP-klient så att den kan ta emot en IP-adress från ISP-nätverket. Eftersom servern är centraliserad behöver du även konfigurera två LAN-routers för att vidarebefordra DHCP-trafik mellan LAN och routern som fungerar som DHCP-server.
Mål
- Konfigurera en router som DHCP-server
- Konfigurera DHCP-Relay
- Konfigurera en router som DHCP-klient
Nätverkstopologi

Adresseringstabell
| Device | Interface | IP Address | Subnet Mask | Default Gateway |
|---|---|---|---|---|
| R1 | G0/0 | 192.168.10.1 | 255.255.255.0 | NA |
| S0/0/0 | 10.1.1.1 | 255.255.255.252 | ||
| R2 | G0/0 | 192.168.20.1 | 255.255.255.0 | NA |
| G0/1 | DHCP tilldelad | DHCP tilldelad | ||
| S0/0/0 | 10.1.1.2 | 255.255.255.252 | ||
| S0/0/1 | 10.2.2.2 | 255.255.255.0252 | ||
| R3 | G0/0 | 192.168.30.1 | 255.255.255.0 | NA |
| S0/0/1 | 10.2.2.1 | 255.255.255.0 | ||
| PC1 | NIC | DHCP tilldelad | DHCP tilldelad | DHCP tilldelad |
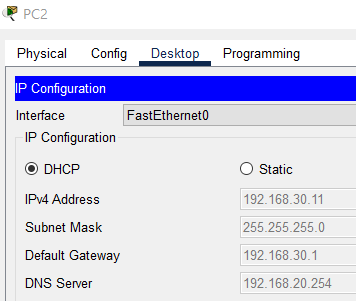
| PC2 | NIC | DHCP tilldelad | DHCP tilldelad | DHCP tilldelad |
| DNS Server | NIC | 192.168.20.254 | 255.255.255.0 | 192.168.20.1 |
Instruktioner
Del 1: Konfigurera en Router som DHCP-server
Steg 1: Konfigurera exkluderade IPv4-adresser.
Konfigurera R2 för att exkludera de första 10 adresserna från R1 och R3 LAN. Alla andra adresser ska vara tillgängliga i DHCP-adresspoolen.
Steg 2: Skapa en DHCP-pool på R2 för R1 LAN.
a. Skapa en DHCP-pool med namnet R1-LAN. Poolnamnet måste matcha detta värde för att du ska få poäng för din konfiguration.
b. Konfigurera DHCP-poolen för att inkludera nätverksadress, default gateway och IP-adressen till DNS-servern.
Steg 3: Skapa en DHCP-pool på R2 för R3 LAN.
a. Skapa en DHCP-pool med namnet R3-LAN (skiftlägeskänsligt).
b. Konfigurera DHCP-poolen för att inkludera nätverksadress, standardgateway och IP-adressen till DNS-servern.
Del 2: Konfigurera DHCP Relay
Steg 1: Konfigurera R1 och R3 som DHCP relay agent
Steg 2: Ställ in PC1 och PC2 för att få IP-adresseringsinformation från DHCP.
Del 3: Konfigurera R2 som DHCP-klient
Steg 1: Konfigurera gränssnittet Gigabit Ethernet 0/1 på R2 för att ta emot IP-adressering från DHCP.
Steg 2: Aktivera interfacet.
Konfigurationer
- Router> enable
- Router# configure terminal
- Router(config)# hostname R1
- R1(config)# interface GigabitEthernet0/0
- R1(config-if)# ip address 192.168.10.1 255.255.255.0
- R1(config-if)# duplex auto
- R1(config-if)# speed auto
- R1(config-if)# no shutdown
- R1(config-if)# exit
- !
- R1(config)# interface GigabitEthernet0/1
- R1(config-if)# no ip address
- R1(config-if)# shutdown
- R1(config-if)# exit
- !
- R1(config)# interface Serial0/0/0
- R1(config-if)# ip address 10.1.1.1 255.255.255.252
- R1(config-if)# no shutdown
- R1(config-if)# exit
- !
- R1(config)# interface Serial0/0/1
- R1(config-if)# no ip address
- 1(config-if)# shutdown
- R1(config-if)# exit
- !
- R1(config)# interface Vlan1
- R1(config-if)# no ip address
- R1(config-if)# shutdown
- R1(config-if)# exit
- !
- R1(config)# router eigrp 1
- R1(config-router)# network 192.168.10.0
- R1(config-router)# network 10.1.1.0 0.0.0.3
- R1(config-router)# end
- R1#
- Router> enable
- Router# configure terminal
- Router(config)# hostname R2
- !
- R2(config)# interface GigabitEthernet0/0
- R2(config-if)# ip address 192.168.20.1 255.255.255.0
- R2(config-if)# duplex auto
- R2(config-if)# speed auto
- R2(config-if)# no shutdown
- R2(config-if)# exit
- !
- R2(config)# interface GigabitEthernet0/1
- R2(config-if)# no ip address
- R2(config-if)# duplex auto
- R2(config-if)# speed auto
- R2(config-if)# shutdown
- R2(config-if)# exit
- !
- R2(config)# interface Serial0/0/0
- R2(config-if)# ip address 10.1.1.2 255.255.255.252
- R2(config-if)# clock rate 64000
- R2(config-if)# no shutdown
- R2(config-if)# exit
- !
- R2(config)# interface Serial0/0/1
- R2(config-if)# ip address 10.2.2.2 255.255.255.252
- R2(config-if)# clock rate 64000
- R2(config-if)# no shutdown
- R2(config-if)# exit
- !
- R2(config)# interface Serial0/1/0
- R2(config-if)# no ip address
- R2(config-if)# shutdown
- R2(config-if)# exit
- !
- R2(config)# interface Serial0/1/1
- R2(config-if)# no ip address
- R2(config-if)# shutdown
- R2(config-if)# exit
- !
- R2(config)# interface Vlan1
- R2(config-if)# no ip address
- R2(config-if)# shutdown
- R2(config-if)# exit
- !
- R2(config)# router eigrp 1
- R2(config-router)# network 192.168.20.0
- R2(config-router)# network 10.1.1.0 0.0.0.3
- R2(config-router)# network 10.2.2.0 0.0.0.3
- R2(config-router)# network 209.165.200.224 0.0.0.31
- R2(config-router)# end
- R2#
- Router> enable
- Router# configure terminal
- Router(config)# hostname R3
- !
- R3(config)# interface GigabitEthernet0/0
- R3(config-if)# ip address 192.168.30.1 255.255.255.0
- R3(config-if)# duplex auto
- R3(config-if)# speed auto
- R3(config-if)# no shutdown
- R3(config-if)# exit
- !
- R3(config)# interface GigabitEthernet0/1
- R3(config-if)# no ip address
- R3(config-if)# shutdown
- R3(config-if)# exit
- !
- R3(config)# interface Serial0/0/0
- R3(config-if)# no ip address
- R3(config-if)# shutdown
- R3(config-if)# exit
- !
- R3(config)# interface Serial0/0/1
- R3(config-if)# ip address 10.2.2.1 255.255.255.0
- R3(config-if)# no shutdown
- R3(config-if)# exit
- !
- R3(config)# interface Vlan1
- R3(config-if)# no ip address
- R3(config-if)# shutdown
- R3(config-if)# exit
- !
- R3(config)# router eigrp 1
- R3(config-router)# network 10.2.2.0 0.0.0.3
- R3(config-router)# network 192.168.30.0
- R3(config-router)# end
- R3#
Steg 1: Konfigurera exkluderade IPv4-adresser.
Steg 2: Skapa en DHCP-pool på R2 för R1 LAN.
Steg 3: Skapa en DHCP-pool på R2 för R3 LAN.
- R2(config)# ip dhcp excluded-address 192.168.10.1 192.168.10.10
- R2(config)# ip dhcp excluded-address 192.168.30.1 192.168.30.10
- R2(config)# ip dhcp pool R1-LAN
- R2(dhcp-config)# network 192.168.10.0 255.255.255.0
- R2(dhcp-config)# default-router 192.168.10.1
- R2(dhcp-config)# dns-server 192.168.20.254
- R2(dhcp-config)# exit
- R2(dhcp-config)#
- R2(config)# ip dhcp pool R3-LAN
- R2(dhcp-config)# network 192.168.30.0 255.255.255.0
- R2(dhcp-config)# default-router 192.168.30.1
- R2(dhcp-config)# dns-server 192.168.20.254
- R2(dhcp-config)# end
- R2#
Steg 1: Konfigurera R1 och R3 som DHCP relay agent
-
R1(config)# interface g0/0
-
R1(config-if)# ip helper-address 10.1.1.2
-
R1(config-if)# exit
-
R1(config)#
-
R3(config)# interface g0/0
-
R3(config-if)# ip helper-address 10.2.2.2
-
R3(config-if)# exit
-
R3(config)#
Steg 2: Ställ in PC1 och PC2 för att få IP-adresseringsinformation från DHCP.

Step 1: Configure the Gigabit Ethernet 0/1 interface on R2 to receive IP addressing from DHCP.
Step 2: Activate the interface.
- R2(config)# interface g0/1
- R1(config-if)# ip address dhcp
- R1(config-if)# no shutdown
- R1(config-if)#
Denna laboration visar hur man genomför en DHCP-konfiguration i en utbildningsmiljö med hjälp av Packet Tracer, och ger en detaljerad guide genom de olika stegen i konfigurationsprocessen.