Labb 21D2: IPv6 nätverk | FHRP koncepten
I den här laborationen kommer du att bygga och konfigurera ett nätverk som använder både stateless och stateful DHCPv6 för adresstilldelning. Laborationen är utformad för att ge dig praktisk erfarenhet av att konfigurera olika IPv6-tjänster på Cisco-routrar:
- SLAAC
- Stateless DHCPv6
- Stateful DHCPv6
- DHCPv6 Relay.
Genom att genomföra de olika delarna av laborationen kommer du att få en djupare förståelse för hur dynamisk IPv6-adresstilldelning hanteras i moderna nätverk, och hur du kan tillämpa dessa tekniker i en verklig miljö.
När SLAAC används för att tilldela IPv6-adresser till IPv6-klienter används ingen DHCPv6-server. Eftersom en DHCPv6-server inte används vid implementering av SLAAC, kan klienter inte ta emot ytterligare kompletterande nätverksinformation, inklusive en domännamnserver (DNS) adress samt ett domännamn.
När Stateless DHCPv6 används för att tilldela IPv6-adresser till värdar används en DHCPv6-server för att tilldela ytterligare kompletterande nätverksinformation, men IPv6-adressen tilldelas med SLAAC.
Vid implementering av Stateful DHCPv6 tilldelar en DHCPv6-server all nätverksinformation, inklusive IPv6-adressen.
Bestämningen av hur klienter erhåller sin dynamiska IPv6-adressering beror på inställningen av flaggor i routerannonsmeddelandena (RA).
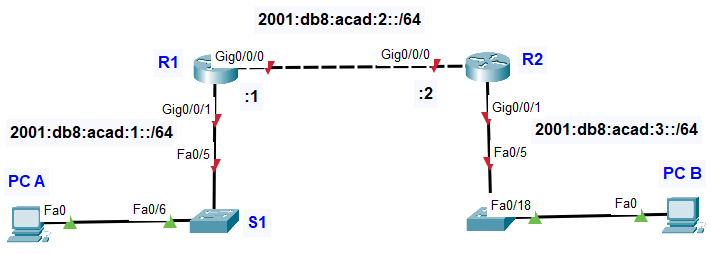
I denna laboration används topologin nedan:
Mål
- Bygg nätverket och konfigurera grundläggande enhetsinställningar
- Verifiera SLAAC-adresstilldelning från R1
- Konfigurera och verifiera en Stateless DHCPv6-server på R1
- Konfigurera och verifiera en Stateful DHCPv6-server på R1
- Konfigurera och verifiera en DHCPv6-relay på R2
Konfigurationer
Step 1: Cable the network as shown in the topology.
Attach the devices as shown in the topology diagram, and cable as necessary.
Step 2: Configure basic settings for each switch. (Optional)
a. Assign a device name to the switch S1.
- Switch(config)# hostname S1
- S1(config)#
b. Disable DNS lookup to prevent the router from attempting to translate incorrectly entered commands as
though they were host names.
- S1(config)# no ip domain-lookup
c. Assign class as the privileged EXEC encrypted password.
- S1(config)# enable secret class
d. Assign cisco as the console password and enable login.
- S1(config)# line console 0
- S1(config-line)# password cisco
- S1(config-line)# login
- S1(config-line)# exit
e. Assign cisco as the VTY password and enable login.
- S1(config)# line vty 0 4
- S1(config-line)# password cisco
- S1(config-line)# login
- S1(config-line)# exit
f. Encrypt the plaintext passwords.
- S1(config)# service password-encryption
g. Create a banner that warns anyone accessing the device that unauthorized access is prohibited
- S1(config)# banner motd "Unauthorized Access is Prohibited."
h. Shutdown all unused ports
- S1(config)# interface range fa0/1-4
- S1(config-if-range)# shutdown
- S1(config-if-range)# exit
- S1(config)# interface range fa0/7-24
- S1(config-if-range)# shutdown
- S1(config-if-range)# exit
- S1(config)# interface range g0/1-2
- S1(config-if-range)# shutdown
- S1(config-if-range)# end
i. Save the running configuration to the startup configuration file.
- S1# copy running-config startup-config
Configuration of switch S2
- Switch(config)# hostname S2
- S2(config)#
- S2(config)# no ip domain-lookup
- S2(config)# enable secret class
- S2(config)# line console 0
- S2(config-line)# password cisco
- S2(config-line)# login
- S2(config-line)# exit
- S2(config)# line vty 0 4
- S2(config-line)# password cisco
- S2(config-line)# login
- S2(config-line)# exit
- S2(config)# service password-encryption
- S2(config)# banner motd "Unauthorized Access is Prohibited."
- S2(config)# interface range fa0/1-4
- S2(config-if-range)# shutdown
- S2(config-if-range)# exit
- S2(config)# interface range fa0/6-17
- S2(config-if-range)# shutdown
- S2(config-if-range)# exit
- S2(config)# interface range fa0/19-24
- S2(config-if-range)# shutdown
- S2(config-if-range)# exit
- S2(config)# interface range g0/1-2
- S2(config-if-range)# shutdown
- S2(config-if-range)# end
- S2# copy running-config startup-config
Step 3: Configure basic settings for each router.
a. Assign a device name to the router.
- Router(config)# hostname R1
b. Disable DNS lookup to prevent the router from attempting to translate incorrectly entered commands as
though they were host names.
- R1(config)# no ip domain-lookup
c. Assign class as the privileged EXEC encrypted password.
- R1(config)# enable secret class
d. Assign cisco as the console password and enable login.
- R1(config)# line console 0
- R1(config-line)# password cisco
- R1(config-line)# login
- R1(config-line)# exit
e. Assign cisco as the VTY password and enable login.
- R1(config)# line vty 0 4
- R1(config-line)# password cisco
- R1(config-line)# login
- R1(config-line)# exit
f. Encrypt the plaintext passwords.
- R1(config)# service password-encryption
g. Create a banner that warns anyone accessing the device that unauthorized access is prohibited.
- R1(config)# banner motd "Unauthorized Access is Prohibited."
h. Enable IPv6 Routing
- R1(config)# ipv6 unicast-routing
- R1(config)# end
i. Save the running configuration to the startup configuration file.
- R1# copy running-config startup-config
Router R2 Configuration
- Router(config)# hostname R2
- R2(config)# no ip domain-lookup
- R2(config)# enable secret class
- R2(config)# line console 0
- R2(config-line)# password cisco
- R2(config-line)# login
- R2(config-line)# exit
- R2(config)# line vty 0 4
- R2(config-line)# password cisco
- R2(config-line)# login
- R2(config-line)# exit
- R2(config)# service password-encryption
- R2(config)# banner motd "Unauthorized Access is Prohibited."
- R2(config)# ipv6 unicast-routing
- R2(config)# end
- R2# copy running-config startup-config
Step 4:Configure interfaces and routing for both routers.
a. Configure the G0/0/0 and G0/0/1 interfaces on R1 and R2 with the IPv6 addresses specified in the table
above.
- R1(config)# interface g0/0/0
- R1(config-if)# ipv6 address 2001:db8:acad:2::1/64
- R1(config-if)# ipv6 address fe80::1 link-local
- R1(config-if)# no shutdown
- R1(config-if)# exit
- R1(config)# interface g0/0/1
- R1(config-if)# ipv6 address 2001:db8:acad:1::1/64
- R1(config-if)# ipv6 address fe80::1 link-local
- R1(config-if)# no shutdown
- R1(config-if)# exit
- R2(config)# interface g0/0/0
- R2(config-if)# ipv6 address 2001:db8:acad:2::2/64
- R2(config-if)# ipv6 address fe80::2 link-local
- R2(config-if)# no shutdown
- R2(config-if)# exit
- R2(config)# interface g0/0/1
- R2(config-if)# ipv6 address 2001:db8:acad:3::1/64
- R2(config-if)# ipv6 address fe80::1 link-local
- R2(config-if)# no shutdown
- R2(config-if)# exit
b. Configure a default route on each router pointed to the IP address of G0/0/0 on the other router using the
following commands.
- R1(config)# ipv6 route ::/0 2001:db8:acad:2::2
- R1(config)# end
- R2(config)# ipv6 route ::/0 2001:db8:acad:2::1
- R2(config)# end
c. Verify routing is working by pinging R2’s G0/0/1 address from R1.
R1#ping 2001:db8:acad:3::1

Type escape sequence to abort.
Sending 5, 100-byte ICMP Echos to 2001:db8:acad:3::1, timeout is 2 seconds:
!!!!!
Success rate is 100 percent (5/5), round-trip min/avg/max = 0/0/0 ms

R1#
d. Save the running configuration to the startup configuration file.
- R1# copy running-config startup-config
- R2# copy running-config startup-config
In Part 2, you will verify that Host PC-A receives an IPv6 address using the SLAAC method.
a. Power up PC-A and ensure that the NIC is configured for IPv6 automatic configuration.
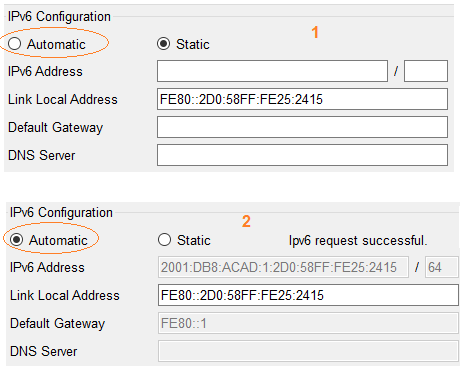
b. After a few moments, the results of the command ipconfig should show that PC-A has assigned itself an
address from the 2001:db8:1::/64 network.
C:\>ipconfig /all

FastEthernet0 Connection:(default port)

   Connection-specific DNS Suffix..:
   Physical Address................: 00D0.5825.2415
   Link-local IPv6 Address.........: FE80::2D0:58FF:FE25:2415
   IPv6 Address....................: 2001:DB8:ACAD:1:2D0:58FF:FE25:2415
   IPv4 Address....................: 0.0.0.0
   Subnet Mask.....................: 0.0.0.0
   Default Gateway.................: FE80::1
                                     0.0.0.0
   DHCP Servers....................: 0.0.0.0
   DHCPv6 IAID.....................:
   DHCPv6 Client DUID..............: 00-01-00-01-02-E5-A2-61-00-D0-58-25-24-15
   DNS Servers.....................: ::
                                     0.0.0.0
00D0 = 0000 0000 1101 0000
02D0 = 0000 0010 1101 0000
0 2 D 0
Part 3: Configure and Verify a DHCPv6 server on R1
In Part 3, you will configure and verify a stateless DHCP server on R1. The objective is to provide PC-A with
DNS server and Domain information.
Step 1: Examine the configuration of PC-A in more detail.
a. Issue the command ipconfig /all on PC-A and take a look at the output.
C:\>ipconfig /all

FastEthernet0 Connection:(default port)

   Connection-specific DNS Suffix..:
   Physical Address................: 00D0.5825.2415
   Link-local IPv6 Address.........: FE80::2D0:58FF:FE25:2415
   IPv6 Address....................: 2001:DB8:ACAD:1:2D0:58FF:FE25:2415
   IPv4 Address....................: 0.0.0.0
   Subnet Mask.....................: 0.0.0.0
   Default Gateway.................: FE80::1
                                     0.0.0.0
   DHCP Servers....................: 0.0.0.0
   DHCPv6 IAID.....................:
   DHCPv6 Client DUID..............: 00-01-00-01-02-E5-A2-61-00-D0-58-25-24-15
   DNS Servers.....................: ::
                                     0.0.0.0
b. Notice that there is no Primary DNS suffix. Also note that the DNS server addresses provided are “site
local anycast” addresses, and not unicast addresses, as would be expected.
Step 2: Configure R1 to provide stateless DHCPv6 for PC-A.
a. Create an IPv6 DHCP pool on R1 named R1-STATELESS. As a part of that pool, assign the DNS server
address as 2001:db8:acad::254 and the domain name as stateless.com.
- R1(config)# ipv6 dhcp pool R1-STATELESS
- R1(config-dhcp)# dns-server 2001:db8:acad::254
- R1(config-dhcp)# domain-name stateless.com
b. Configure the G0/0/1 interface on R1 to provide the OTHER config flag to the R1 LAN, and specify the
DHCP pool you just created as the DHCP resource for this interface.
- R1(config)# interface g0/0/1
- R1(config-if)# ipv6 nd other-config-flag
- R1(config-if)# ipv6 dhcp server R1-STATELESS
c. Save the running configuration to the startup configuration file.
d. Restart PC-A.
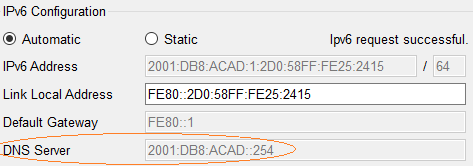
e. Examine the output of ipconfig /all and notice the changes.
C:\>ipconfig /all

FastEthernet0 Connection:(default port)

   Connection-specific DNS Suffix..: STATELESS.com
   Physical Address................: 00D0.5825.2415
   Link-local IPv6 Address.........: FE80::2D0:58FF:FE25:2415
   IPv6 Address....................: 2001:DB8:ACAD:1:2D0:58FF:FE25:2415
   IPv4 Address....................: 0.0.0.0
   Subnet Mask.....................: 0.0.0.0
   Default Gateway.................: FE80::1
                                     0.0.0.0
   DHCP Servers....................: 0.0.0.0
   DHCPv6 IAID.....................: 136798132
   DHCPv6 Client DUID..............: 00-01-00-01-02-E5-A2-61-00-D0-58-25-24-15
   DNS Servers.....................: 2001:DB8:ACAD::254
                                     0.0.0.0
f. Test connectivity by pinging R2’s G0/0/1 interface IP address.
C:\>ping 2001:db8:acad:3::1

Pinging 2001:db8:acad:3::1 with 32 bytes of data:

Reply from 2001:DB8:ACAD:3::1: bytes=32 time=9ms TTL=254
Reply from 2001:DB8:ACAD:3::1: bytes=32 time<1ms TTL=254
Reply from 2001:DB8:ACAD:3::1: bytes=32 time<1ms TTL=254
Reply from 2001:DB8:ACAD:3::1: bytes=32 time<1ms TTL=254

Ping statistics for 2001:DB8:ACAD:3::1:
    Packets: Sent = 4, Received = 4, Lost = 0 (0% loss),
Approximate round trip times in milli-seconds:
    Minimum = 0ms, Maximum = 9ms, Average = 2ms
Part 4: Configure a stateful DHCPv6 server on R1
In Part 4, you will configure R1 to respond to DHCPv6 requests from the LAN on R2.
a. Create a DHCPv6 pool on R1 for the 2001:db8:acad:3:aaaa::/80 network. This will provide addresses to
the LAN connected to interface G0/0/1 on R2. As a part of the pool, set the DNS server to
2001:db8:acad::254, and set the domain name to stateful.com.
- R1(config)# ipv6 dhcp pool R2-STATEFUL
- R1(config-dhcp)# address prefix 2001:db8:acad:3:aaa::/80
- R1(config-dhcp)# dns-server 2001:db8:acad::254
- R1(config-dhcp)# domain-name stateful.com
b. Assign the DHCPv6 pool you just created to interface g0/0/0 on R1.
- R1(config)# interface g0/0/0
- R1(config-if)# ipv6 dhcp server R2-STATEFUL
Part 5: Configure and verify DHCPv6 relay on R2.
In Part 5, you will configure and verify DHCPv6 relay on R2, allowing PC-B to receive an IPv6 Address.
Step 1: Examine the SLAAC address.
a. Power on PC-B.
b. Examine the SLAAC address that is generated.

c. Notice in the output that the prefix used is 2001:db8:acad:3::
C:\>ipconfig /all

FastEthernet0 Connection:(default port)

   Connection-specific DNS Suffix..:
   Physical Address................: 0060.4770.60BD
   Link-local IPv6 Address.........: FE80::260:47FF:FE70:60BD
   IPv6 Address....................: 2001:DB8:ACAD:3:260:47FF:FE70:60BD
   IPv4 Address....................: 0.0.0.0
   Subnet Mask.....................: 0.0.0.0
   Default Gateway.................: FE80::1
                                     0.0.0.0
   DHCP Servers....................: 0.0.0.0
   DHCPv6 IAID.....................:
   DHCPv6 Client DUID..............: 00-01-00-01-35-43-A7-31-00-60-47-70-60-BD
   DNS Servers.....................: ::
                                     0.0.0.0
Step 2: Configure R2 as a DHCP relay agent for the LAN on G0/0/1.
a. Configure the ipv6 dhcp relay command on R2 interface G0/0/1, specifying the destination address of
the G0/0/0 interface on R1. Also configure the managed-config-flag command.
- R2(config)# interface g0/0/1
- R2(config-if)# ipv6 nd managed-config-flag
- R2(config-if)# ipv6 dhcp relay destination 2001:db8:acad:2::1 g0/0/0
Not supported on Packet Tracer! Solution: configure R2 as stateful DHCPv6 server.
- R2(config)# ipv6 dhcp pool R2-STATEFUL
- R2(config-dhcp)# address prefix 2001:db8:acad:3:aaa::/80
- R2(config-dhcp)# dns-server 2001:db8:acad::254
- R2(config-dhcp)# domain-name stateful.com
- R2(config-dhcp)# exit
- R2(config)# interface g0/0/1
- R2(config-if)# ipv6 dhcp server R2-STATEFUL
- R2(config-if)# end
- R2#
b. Save your configuration.
- R2# copy running-config startup-config
Step 3: Attempt to acquire an IPv6 address from DHCPv6 on PC-B.
a. Restart PC-B.
b. Open a command prompt on PC-B and issue the command ipconfig /all and examine the output to see
the results of the DHCPv6 relay operation.
C:\>ipconfig /all

FastEthernet0 Connection:(default port)

   Connection-specific DNS Suffix..: stateful.com
   Physical Address................: 0060.4770.60BD
   Link-local IPv6 Address.........: FE80::260:47FF:FE70:60BD
   IPv6 Address....................: 2001:DB8:ACAD:3:AAA:DCF1:9499:6AD3
   IPv4 Address....................: 0.0.0.0
   Subnet Mask.....................: 0.0.0.0
   Default Gateway.................: FE80::1
                                     0.0.0.0
   DHCP Servers....................: 0.0.0.0
   DHCPv6 IAID.....................: 1680948841
   DHCPv6 Client DUID..............: 00-01-00-01-35-43-A7-31-00-60-47-70-60-BD
   DNS Servers.....................: 2001:DB8:ACAD::254
c. Test connectivity by pinging R1’s G0/0/1 interface IP address.
C:\>ping 2001:db8:acad:1::1

Pinging 2001:db8:acad:1::1 with 32 bytes of data:

Reply from 2001:DB8:ACAD:1::1: bytes=32 time=21ms TTL=254
Reply from 2001:DB8:ACAD:1::1: bytes=32 time<1ms TTL=254
Reply from 2001:DB8:ACAD:1::1: bytes=32 time=11ms TTL=254
Reply from 2001:DB8:ACAD:1::1: bytes=32 time<1ms TTL=254
Ping statistics for 2001:DB8:ACAD:1::1:
       Packets: Sent = 4, Received = 4, Lost = 0 (0% loss),
Approximate round trip times in milli-seconds:
       Minimum = 0ms, Maximum = 21ms, Average = 8ms C:\>